Showing posts with label paper piecing. Show all posts

Wednesday, April 6, 2016

Paper Piecing Bee

A new form of quilting fun has started. 

NHMQG's first bee was a huge success. This bee was geared to members wishing to learn more about paper piecing. Michelle was our fearless leader taking the charge! We got together for a few hours on a Sunday afternoon for some sewing and snacks. 

For those experiencing quilting envy, we are planning more bees this year! 

The crew in action! Smiles all around.

A quilting miracle also happened.

Chelsea had a large stack of HSTs that needed trimming. While people waited for a machine, these beauties got squared up. Over 200 HSTs! Ah, teamwork is amazing.


Betsy brought her new add-a-quarter-inch ruler to try out. At the end of day we had all purchased both the 6-inch and 12-inch ruler. It was a hit. 


The day ended with a bounty of beautiful Dutch Windmill blocks. The navy and random solids are going to look stunning in a finished quilt. Everyone was very proud of their accomplishments; they all look amazing. The color combinations are stunning. Rosa even contributed her paw of approval. 


Friday, February 26, 2016

Paper Piecing Recap

NHMQG Member's Guide to Paper Piecing


At the February meeting member's created think groups to come up with tips and tricks for paper piecers. Here is what our brains collectively have to say ...


TIPS:  


IN GENERAL: 
  • No Steam, it causes warping and distortion
  • Very small stitch length, 1.5mm 
  • When sewing a piece start 1/4" before the line being sewn
  • Instead of seam ripping, cut fabric close to seam and pull away, sew the next seam a smidge over from the original seam
  • Go for chain piecing if possible
  • Print 100%, make sure to check "Actual Size" in the printer's settings and always print from the same printer to ensure consistency  

TIME SAVING:
  • Don't skimp on fabric pieces, or use templates for more involved patterns and don't be afraid to waste
  • Keep small cutting mat, rotary cutter, ruler, and iron near the machine
  • A light box is helpful when tracing patterns, or place a light under a glass top table
  • Cut all fabric ahead of time and label

REMOVING PAPER: 
  • Use tweezers to remove small bits of paper stuck in the stitches
  • Remove paper in the opposite order the pieces were sewn
  • When using regular copy paper, the cheaper the better also pre-score the paper before sewing to make it easier to remove


TOOLS (nice but not necessary): 

PAPER
  • Carol Doak Foundation Paper - paper designed especially for paper piecing, can be printed on, no shrinkage, and rips away easily
  • Newsprint - a cheaper alternative that also can be printed on and also rips away nicely, some newsprints shrink be sure to test first

EXTRAS: 


*Disclaimer: Links are to provide a visual of each product.  The guild does not market or endorse any retailers or brands.

Tuesday, February 23, 2016

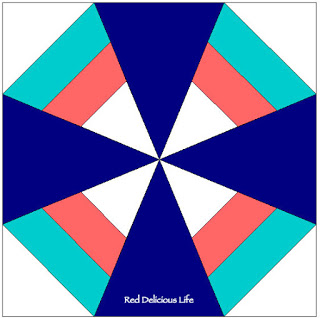
February’s Dutch Windmill Block


Image used with permission

At the February meeting, we introduced the Dutch Windmill Block, from Red Delicious Life. It’s a beginner paper-piecing block, perfect for those guild members who want to try this technique or practice for our June workshop with Amy Garro!

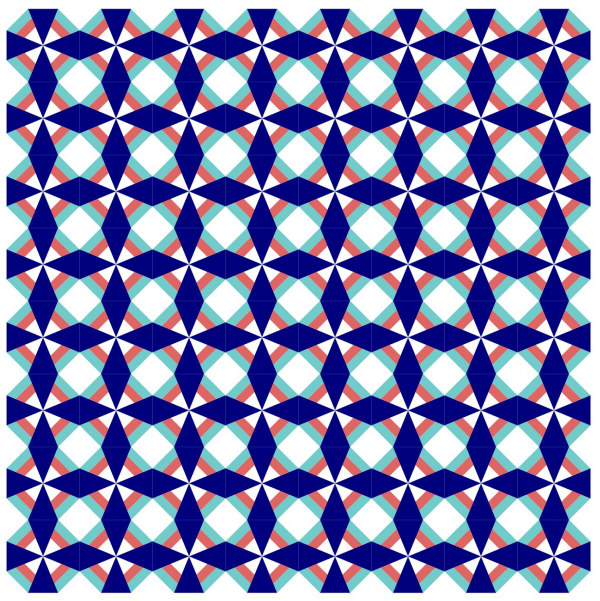
This block may seem humble, but something magical happens when it’s pieced in a quilt:


Image used with permission

We will be donating the finished quilt to a yet-to-be-chosen charity. To participate, use the pattern handed out at the February meeting. You need four copies to make a complete block; you may photocopy (just double-check that copies are the exact same size as the original) or trace the pattern.

Some well-seasoned paper piecers in the guild—thank you!—cautioned against printing from different printers for this project to avoid discrepancies in the pattern dimensions (this has nothing to do with the pattern itself or with your printer
’s settings), so be sure to use the provided pattern instead of printing one out yourself. 

For sections A1 and A5, use the white fabric handed out at the meeting. For section A4, use the navy fabric handed out. You may use any color you want from your scraps for sections A2 and A3 as long as you (1) use solids, (2) use the same solids in all four quadrants of the block, and (3) do not use white or navy. Please keep the paper on the pattern after you’re done sewing.

Read the full tutorial: At Red Delicious Life

Unfinished size: 12.5”

Due date: At the monthly meeting on March 15

Questions: Click on the email button in the sidebar to send us any questions about this project

Saturday, January 30, 2016

June Events with Amy Garro

We are thrilled to announce that we will be hosting quilter and teacher Amy Garro for a weekend in June. Amy blogs about her creative journey at 13 Spools and released her first book last year: Paper Pieced Modern.

On Saturday, June 11, Amy will be conducting an intermediate-level paper-piecing workshop at Quilted Threads in Henniker, NH. This all-day class will focus on sewing Icy Waters, the quilt design featured on the cover of Paper Pieced Modern. Cost for the event for members is $100/person and includes lunch. (Participants are also required to own a copy of Paper Pieced Modern. We will be placing an order for books in the spring.) You can sign up for this event at the February guild meeting.

Then join us on Sunday, June 12, for an afternoon trunk show with Amy at Messiah Lutheran Church in Amherst, NH. Participants will be encouraged to view Amy's designs up close at this event that will feature 15 of her amazing quilts. Admission for this event for NHMQG members is free. Admission for the public is $5/person.

We hope you'll join us for these events. Amy's signature designs and free-motion quilting are exceptional. The weekend is sure to be both educational and inspiring!